Documentation
This is the documentation of the old free version 0.666 (devils tools). You may be looking for the current version 0.81 (era:hip.py tools).
Activating Prequesites
You need at least two objects selected. Where the active object will be the target object and all other selected ones gonna be source objects.
A source objects needs exactly one face to be selected. The target face needs at least one face selected. When everything is selected you can press the shortcut to start the addons modal (which by default is F7 , but you can change it in the addon section of prefences).
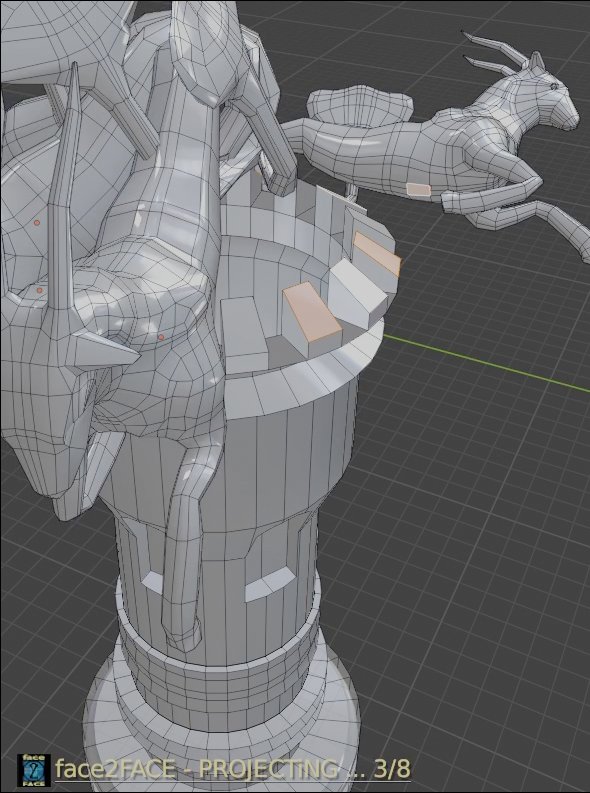
The source objects (normaly copys of it) where then projected in a way that their selected face will be placed face to face onto each of the target faces.
The different modal states
This addon works as an modal operator, which means that things can done in different ways and orders. An can be altered, changed and tweaked during excecution. (By the way it is also possible to pick your work up again and alter it after you aplied your projections) This is done inside the different modal states. After hitting your shortcut to start the face2FACE addon, you always get into the ...
IDLE state
From here you can reach the all the different transform states:
-
G - enters the GRABBING state.
-
S - enters the SCALING state.
-
R - enters the ROTATING state
Or do some operations which will act on all transformations at once (All other states also have this option, but for the corresponding transform only):
-
A - adopts the scaling, rotating and the offset from the active object for all the other selected object.
-
O - resets all transformations to all selected objects into its original state .
Or use the selection possibilities which were available globally in each of the states.
You can also alter the view in each state based on your personal settings as long as they did not conflict with the shortcuts of the modal operator. This is the case for example if you have, for some cumbersome reason, set your view pan to the S key. Then the modal will consume the event and your view settings wont work anymore.
After you have tweaked the projection inside the different states in a way you like, you can apply them and leave the modal operaror. Or abort what you have done and return to the state before you started:
-
LEFT MOUSE BUTTONor RETURN - apply changes (holds for all the states).
-
RIGHT MOUSE BUTTONor ESCAPE - abort changes (holds for all the states).
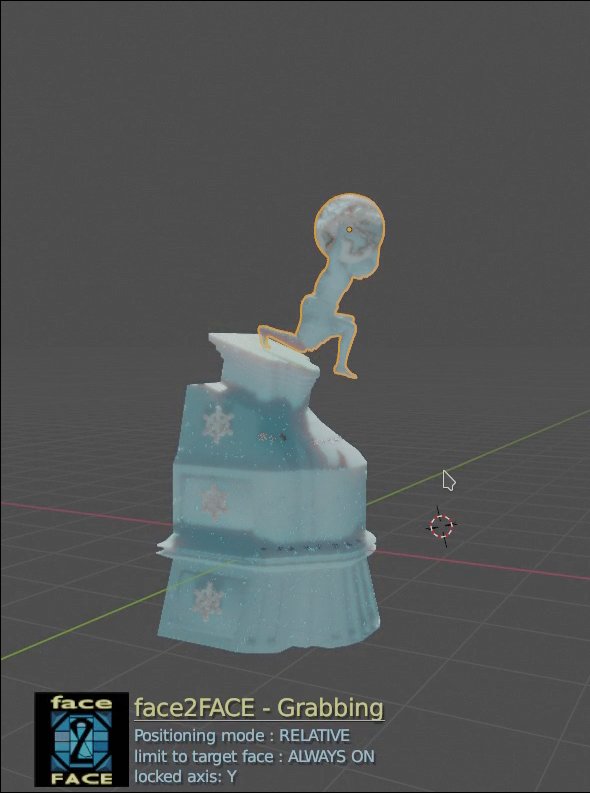
GRABBING state
This is the state in which you can change the position of the projected objects (or in other words the offset to their projection points on the target faces). It can be done by just moving the mouse around. Than the active object will be placed on the XY plane in account to the view. And all other selected objects will then placed depending on the mode respectively on their target face plane.
-
R/A - toggles the positioning modes from RELATIVE to ABSOLUTE positioning.
-
L - toggles the LIMIT mode on and off. If activated the changes can only applied if the projected source face stays inside the bounds of the target face. It it is always on in RELATIVE mode.
-
X/Y/Z - constrains the transform to a specific axis.
-
ALT+(1-9) position by a precise offset entered on the keyboard in a way that is common in blender. Can be constrained on the X or Y axis.
Adapt and recenter
-
A - adopts the offset from the active object for all the other selected objects.
-
O - resets the offset of all selected objects into its original state .
Positioning modes: RELATIVE vs ABSOLUTE positioning
RELATIVE positioning takes the size of the target faces into account. While in absolute positioning the offset of the other selected objects is exactly the same as the active manipulated object. TODO ADD EXAMPLE PICS
SCALING state
This state as the name suggest is for altering the scale of the projected objects. Again it can be achieved by moving the mouse. Moving to the right increases the scale while moving to the left decreases.
-
E - stretch the scale so the source faces are fitting into their target faces evenly (which means all object are scaled with the same factor. So when the target faces have different sizes only the smallest will fit). Can be constrained to X or Y axis.
-
I - stretch the scale so the source face fits into its target face individualy (which means that the scale factor for each object will be adjusted in a way that the faces all fit individually). Can be constrained to X or Y axis.
-
V - enter mode to edit the variation scale strength (which affects how much random variation each objects scale has). the maximun value for the variable can be edited in the settings
-
R - enter mode to edit the relative scale strength (which affects how much the target face size is taken into account). the maximun value for the variable can be edited in the settings
-
L - toggles the limit mode on and off. If activated the changes can only applied if the projected source face stays inside the bounds of the target face. It it is always on in RELATIVE mode, because the relative point can only be computed inside the face bounds.
-
X/Y/Z - constrains the scaling to a specific axis.
Adapt and reset
-
A - adopts the scaling from the active object for all the other selected objects.
-
O - resets the scaling of all selected objects into its original state .
ROTATING state
And last but not least the state for altering the rotation of the projected objects. Moving the mouse to the right rotates in clockwise direction and moving to the left the other way round.
-
V - enter mode to edit the variation rotation strength (which affects how much random variation each objects rotation has). the maximun value for the variable can be edited in the settings
-
I - toggle the rotation direction between counter- and clockwise.
Aligning
-
E - align a fixed target face edge with one of the source face edges.
-
ALT+E - align a fixed source face edge with one of the target face edges.
-
SHIFT+E - counterclockwise align a fixed target face edge with one of the source face edges.
-
SHIFT+ALT+E - counterclockwise align a fixed source face edge with one of the target face edges.
-
SHIFT+ALT+E - counterclockwise align a fixed source face edge with one of the target face edges.
Rotate by fix step angles
-
-> - rotate in steps around a fixed angle in clockwise direction.
-
<- - rotate in steps around a fixed angle in counter-clockwise direction.
-
ALT+->or<- - rotate in steps around an alternative fixed angle
-
SHIFT+->or<- - rotate in steps around an alternative fixed angle
-
CTRL+->or<- - rotate in steps around an alternative fixed angle
Precise
-
ALT+(1-9) rotate around a precise angle entered on the keyboard in a way that is common in blender.
Adapt and reset
-
A - adopts the rotation from the active object for all the other selected objects.
-
O - resets the rotation of all selected objects into its original state .
SELECTION possibilities
Selections of the projected objects can be done in various ways. For example with an imitated box, circle and single selection similar to the normal blender ones. But also by object type, target face type or for example objects on the same faceloop. Some shortcuts here depend on wether you have RIGHT CLICK SELECT or LEFT CLICK SELECT enabled. So we will write in the following about SELECTIVE MOUSE BUTTON and the CANCELING MOUSE BUTTON, which means depending on your choice RIGHT MOUSE BUTTON or LEFT MOUSE BUTTON.
target face type selection mode
Select objects based on their target face type (which is simply the amount of vertices. Tris, quads, n-gons).
-
ALT+1 select all objects.
-
(3-9) select all objects of the same type and deselect the others.
-
SHIFT+(3-9) select all objects of the same type additionaly to the current selection.
-
CTRL+(3-9) deselect all objects of the same type from the current selection.
object type selection mode
This is the possibility to select objects based on their type (which means they share the same source object).
-
T - enters the type selection mode.
-
SELECTIVE MOUSE BUTTON - select all the objects of the same type.
-
SHIFT+SELECTIVE MOUSE BUTTON - select them additionaly to the current selection.
-
CTRL+SELECTIVE MOUSE BUTTON - deselect them from the current selection.
-
CANCELING MOUSE BUTTONor ESCAPE - for leaving the mode.
faceloop selection mode
This is the possibility to select objects which share the same faceloop. Its only possible when the target faces are quads.
-
F - enters the faceloop selection mode.
-
SELECTIVE MOUSE BUTTON - select all the objects on one of the faceloops.
-
ALT+SELECTIVE MOUSE BUTTON - select all the objects on the other faceloop.
-
SHIFT+SELECTIVE MOUSE BUTTON - select them additionaly to the current selection.
-
ALT+SHIFT+SELECTIVE MOUSE BUTTON - select them additionaly on the other faceloop.
-
CTRL+SELECTIVE MOUSE BUTTON - deselect them from the current selection.
-
ALT+CTRL+SELECTIVE MOUSE BUTTON - deselect them on the other faceloop.
-
CANCELING MOUSE BUTTONor ESCAPE - for leaving the mode.
single object selection
Instead of the common behaviour in blender you have to press also alt for selecting a single object. Its because just the SELECTIVE MOUSE BUTTON is already used for applying or canceling the operations of the state.
-
ALT+SELECTIVE MOUSE BUTTON- just select the object clicked on and deselect the others.
-
SHIFT+SELECTIVE MOUSE BUTTON- toggle the selection of the object clicked on.
box selection mode
Should be like the common behaviour in blender.
-
B - enters the box selection mode.
-
LEFT MOUSE BUTTON - drag a box around the objects which should be additionaly selected.
-
SHIFT+LEFT MOUSE BUTTON - drag a box around the objects which should be deselected.
-
RIGHT MOUSE BUTTONor ESCAPE - for leaving the mode.
circle selection mode
Should be like the common behaviour in blender.
-
C - enters the circle selection mode.
-
LEFT MOUSE BUTTON - objects inside the circle are additionaly selected.
-
SHIFT+LEFT MOUSE BUTTON - objects inside the circle are deseleted.
-
WHEEL UP - increases the circle size.
-
WHEEL DOWN - decreases the circle size.
-
RIGHT MOUSE BUTTONor ESCAPE - for leaving the mode.
reset transforms into its original state
The transform will be reseted to its state at the start of the modal operator right after their projections. Deleting all changes ever made. If you want just to undo the currently changes done in a specific transform state like grab, scale or rotate just leave the state with RIGHT MOUSE BUTTONor ESCAPE.
Settings
With the help of the settings you can change the face2FACE addon to fit your needs. We have global settings which can be found in the blender preferences. They will count for each new created session. And there are local settings which can be found in the 3D View N-Panel under the f2F addons Tab. They will only be saved in the specific file and used when file is loaded with such altered settings.
funtional
Settings altered in this section are changing the face2Face projection behaviour.
Creation
Settings which influences the created projections.
-
linked_copy - Decides wether the projected objects are sharing their data or not.
-
linked_from_source - if linked copy is enabled you can decide if the projected objects are linked from the source object data or if they are seperately linked.
-
copy_when_single_target - when only 1 target face is selected you may directly project the source object.
Delete
Settings which will determ how to delete projections.
-
delete_objects_also - if enabled the view will be set aligned to the currently active object.
-
delete_target_object_also - visualize the none selected objects of the projection.
Max scale variation
-
max_scale_variation_strength - set the maximum scale variation. Determs a range of variation.
-
max_scale_relative_strength - set the maximum relative strength. Determs how much the target face size is taken into account.
Step size for variation
This can be usefull for for example if you have buildings and want to project them randomly on a square plane. you can restrict the variation to 90 degree. And the buildings will stick straigth to the streets. TODO: insert example pics
-
vary_rotation_step - set the step size for the random rotation variation.
-
vary_scale_step - set the step size for the random scale variation.
usability
Settings which only alter the user experience.
Start options
-
start_with_relative_pos - choose wether you will start with relative or absolute positioning mode.
-
start_with_limit - choose to limit grab movement in the borders of the target face
(only works in absolute positioning mode).
Step rotation angles
Here you can set the size of the fixed angles at which the projected objects can be rotated via shortcut. The shortcuts can used together, which will add up the angles. For example:
SHIFT + CTRL+-> = shift_rotation_step + ctrl_rotation_step = 5° + 15° = 20°
-
shift_rotation_step - a fixed rotation angle (default 5°) triggered by shortcut
-
ctrl_rotation_step - a fixed rotation angle (default 15°) triggered by shortcut
-
normal_rotation_step - a fixed rotation angle (default 30°) triggered by shortcut
-
alt_rotation_step - a fixed rotation angle (default 45°) triggered by shortcut
visual
-
auto_view - if enabled the view will be set aligned to the currently active object.
-
highlight_projected_objects - visualize the none selected objects of the projection.
-
highlight_rotation_flipped - visualize selected objects which rotation direction is flipped.
-
show_logo - show or hide the face2FACE logo.
The color theme should be self explainable. Just pick your favorite colors.